Lighthouse Laser Cut Files Candle Holder: A Practical Guide to Precision and Safety
There is a distinct satisfaction in watching a laser cutter bring a digital design to life, especially when the final product serves both aesthetic and functional purposes. The Lighthouse Laser Cut Files Candle Holder has become a popular choice for makers looking to add coastal charm to their homes or create unique items for small business inventories. However, the difference between a professional-grade finished piece and a warped, unusable scrap often comes down to preparation and understanding the specific constraints of the design file.
Many enthusiasts rush into cutting without fully reviewing the technical specifications, leading to wasted materials and frustration. This guide addresses common pitfalls associated with this specific 3D lighthouse project and offers actionable advice to ensure your results are safe, sturdy, and visually appealing.
Understanding the Scale and Material Requirements
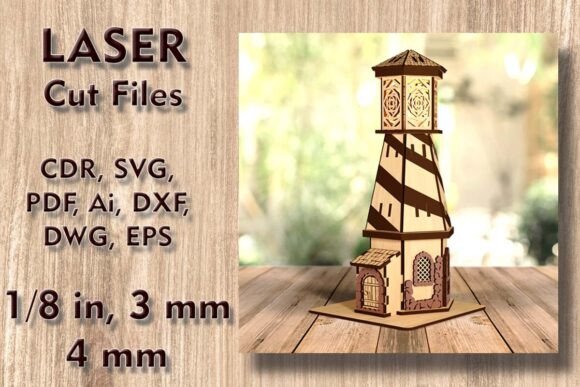
One of the most frequent errors beginners make is assuming that all laser cut files are created equal regarding material usage. This particular Wooden House Laser Cut Files project is not a simple flat ornament; it is a multi-layered 3D structure. The finished product stands at 12 inches high (305 mm) with a base of 5.9 x 5.9 inches (150 x 150 mm). To achieve this height and stability, the design requires precise layering.
A critical oversight occurs when users attempt to nest these parts on standard smaller sheets without checking the maximum dimensions. The material sheet size needed is substantial: 18.9” x 18.5” (480 x 470 mm). If you are using a desktop laser cutter with a smaller bed, such as some entry-level Glowforge models or compact diode lasers, you may find that the largest parts do not fit in a single pass. This forces you to split the design, which can compromise structural integrity if not aligned perfectly.
Better Approach: Before purchasing or downloading, measure your machine’s usable bed size. If your machine cannot accommodate a 480 x 470 mm sheet, verify if the file provider offers a scaled-down version or be prepared to join pieces strategically. Always account for kerf—the width of the laser beam—when calculating fit, especially for interlocking 3D joints.
The Critical Importance of Flameless Lighting
Safety is non-negotiable when crafting items labeled as "candle holders." A dangerous misconception is that because the item is made of wood or MDF, it can safely hold a traditional wax candle or tea light with an open flame. This is a severe fire hazard. Wood is combustible, and the enclosed nature of a lighthouse structure can trap heat, potentially causing scorching, warping, or even ignition.
The design specifications explicitly state: Do not use real candles. Instead, this project is engineered for flameless candles or LED tea lights. Using battery-operated LEDs not only eliminates fire risk but also enhances the longevity of your creation. Real candles produce soot, which will blacken the intricate laser-cut details of the lighthouse windows and walls, ruining the aesthetic appeal after just a few uses.
Practical Advice: Source high-quality LED tea lights with a warm white glow to mimic the ambiance of real fire without the danger. Test the fit of your chosen LED unit before gluing the final layers together. Some battery packs are bulkier than others and may require slight modifications to the base layer if they do not fit snugly within the 150 x 150 mm footprint.
File Compatibility and Software Preparation
Upon purchase, you receive a ZIP folder containing multiple formats: CDR, SVG, DXF, DWG, EPS, AI, and PDF. While this variety suggests universal compatibility, it often leads to confusion about which file to use. Beginners frequently open the PDF or a rasterized image, expecting it to cut cleanly. This results in poor edge quality and excessive cutting time.
For vector-based laser cutting, the SVG or DXF files are generally the safest bets for most hobbyist software. However, professionals using industrial machines might prefer AI or CDR for better node control. A common mistake is failing to check for open paths or duplicate lines in the vector file before sending it to the laser. Duplicate lines cause the laser to cut the same path twice, burning the wood and weakening the joint.
What to Check:
- Open the file in your preferred design software (e.g., LightBurn, Illustrator, CorelDRAW).
- Inspect all nodes to ensure paths are closed and clean.
- Verify that the scale is set to 100% or the intended dimensions (305 mm height).
- Remove any unnecessary anchor points that could cause the laser to stutter.
Material Selection: Plywood vs. MDF
The choice of material significantly impacts the final look and ease of assembly. The design supports plywood, MDF, or other compatible materials. However, each behaves differently under the laser.
Plywood offers a beautiful natural grain but can have voids or uneven layers that affect cutting consistency. It also tends to char more on the edges, requiring more post-processing sanding. MDF, on the other hand, cuts very cleanly with smooth edges but lacks the visual warmth of wood grain and produces more dust during cutting. For a night light lamp where the glow passes through the material, thinner plywood (3mm or 1/8 inch) is often preferred for its translucency and strength.
Common Mistake: Using material that is too thick or too thin. If the material deviates from the recommended thickness specified in the file’s documentation, the interlocking tabs and slots will not fit. Tabs will be too loose, causing the lighthouse to wobble, or too tight, leading to breakage during assembly. Always measure your material with calipers before cutting, as nominal thicknesses (e.g., "1/4 inch") often vary in reality.
Assembly and Finishing for Professional Results
Even with perfect cuts, poor assembly can ruin the project. The 3D house-shaped lighthouse relies on layered alignment. Rushing the gluing process often results in misaligned layers, which distorts the silhouette and prevents the LED light from shining evenly through the windows.
Use a dry-fit method first. Assemble the entire lighthouse without glue to ensure all parts align correctly. Once satisfied, apply wood glue sparingly to the contact surfaces. Excess glue can squeeze out and create visible bumps that are difficult to sand away without damaging the delicate laser-cut edges.
For those selling these items, consider the finish. A clear matte sealant can protect the wood and enhance the glow of the night light. Avoid glossy finishes on the interior, as they can create unwanted reflections that detract from the cozy ambiance.
Final Considerations Before You Cut
Creating a Lighthouse Laser Cut Files Candle Holder is a rewarding project that blends technical precision with artistic expression. By respecting the material dimensions, prioritizing safety with flameless lighting, selecting the correct vector files, and choosing appropriate materials, you avoid the common frustrations that plague many DIY laser projects.
Take the time to review your settings, test your fit, and prioritize safety. The result is a durable, charming piece that brings a warm, coastal vibe to any space, whether it is a nursery nightlight or a decorative centerpiece. Attention to detail is what separates a hobbyist craft from a professional-quality product.